Forum Saradas


Donate today to show love to your community!
gfxgfx
 
Please login or register.

Login with username, password and session length
Advertising
 
gfx gfx
steroidify parapharma
gfxgfx
 
Welcome to Forum Saradas! Female Bodybuilding, Fitness, Figure & Bikini

Do you love female bodybuilding and events like the Olympia and the Arnold Classic? Are you interested in female bodybuilding, fitness, figure & bikini?
If so check out and join our female bodybuilding forum! Saradas is the oldest and most popular female bodybuilding, fitness forum.

🔥 At Saradas you will find the most amazing and rare pictures of probably every female professional bodybuilder who has ever competed.   
🔥 You can keep up with female bodybuilding news from all over the world and hear the latest on your favorite bodybuilder.
🔥 You will find the latest updates on bodybuilding events like the Olympia and the Arnold Classic.

Saradas is your one stop female bodybuilding resource. Come and join us!

Saradas - The Internet Female Bodybuilding Database
 
gfx gfx
gfx
596127 Posts in 78718 Topics by 32075 Members - Latest Member: Benneboat November 10, 2024, 07:21:23 pm
*
gfx* Home | Help | Login | Register | gfx
gfx
Forum Saradas  |  Female BodyBuilding & Fitness & Figure - Members Area  |  All rules and guidelines - FAQ | News & Announcements  |  Guide to The Post Box and General Guide on Posting.
gfx
gfxgfx
 

Author Topic: Guide to The Post Box and General Guide on Posting.  (Read 70739 times)

Offline Sar-Net

  • Jr. Member
  • **
  • Posts: 457
  • Activity:
    0%
  • KARMA: 3205

Forum Saradas


Offline Sar-Net

  • Jr. Member
  • **
  • Posts: 457
  • Activity:
    0%
  • KARMA: 3205
1.) Opening the Post Box
« Reply #1 on: October 27, 2014, 10:54:28 am »

Opening the Post Box.


Now most of you are going "Do we really need to know how to open the post Box?".

Well actually I expect not, but just in case if you refer to the edited image bellow the two blue arrows point to the reply buttons which are at the top and bottom of topics(threads).   These are the basic way of opening a new post box.

Now what I really wanted to talk about is depicted by the green arrow, it points to the "Quote button".   This button is really useful if you want to reply to someone else's comments, images, etc.   What will happen is you will get something like this(See Example quote below.) in the reply box.   Now one of my pet peeves is when someone replies to someone else's post and doesn't use the "quote" or at least copy the text, image, etc. to their post.   So you have to go back threw the topic and try to figure out what they are talking about.   It really gets messed up when topics are merged.  Then it can be almost impossible to figure out what they are talking about.

Example quote

Comments, image links, video links, etc. from the post you clicked "quote" on.


Now it is considered rude to put your reply to the message above the quote, and so you should generally put your reply bellow the quote.  You can edit the quote.  Its generally good form to put some sort of message in the quote if you edit it.   I generally just put "...snip..." to show I cut out parts of the quoted post.  Something like this...

Example edited quote

...snip... video links, etc. ...snip...


This is the image I noted above with the blue arrows on the two "reply" at the top end bottom of threads and the green arrow for "quote".


And below we have depicted the basic Post Box.


Offline Sar-Net

  • Jr. Member
  • **
  • Posts: 457
  • Activity:
    0%
  • KARMA: 3205
2.) Features of the Post Box
« Reply #2 on: October 27, 2014, 10:55:03 am »

Features of the Post Box


I will list all the different icon names and parts of the Post Box.

Here we have the post box.


Below is the first part of the tools in the post box.

First off we have the "Green Arrow" which points to the "Subject"(Title) box for the post.  Generally this will be the woman's name, or other information about the post you are creating.

Next we have the "Red Arrow" which points to the selection pull down for the "Message Icon".  Generally this will just be the standard icon but you can use the other icons to draw attention to special posts.


Here I will list each of the icons in the image above by number and list its function.   In the following posts we will go into using the functions each icon provides to enhance your posts.

1.) Bold
2.) Italic
3.) Underline
4.) strike through
5.) Pre
6.) left justify
7.) Center
8.) Right justify
9.) Font face
10.) Font size
11.) Change color


Here we have the second row of Icons.


1.) Flash link
2.) Image link
3.) URL Link
4.) Email link
5.) FTP link
6.) Glow
7.) Shadow
8.) Marquee
9.) Superscript
10.) Subscript
11.) Teletype
12.) Insert table
13.) Insert code
14.) Insert quote
15.) Hide tag special
16.) Insert unordered list
17.) Insert ordered list
18.) Horizontal rule
19.) Remove formatting
20.) Toggle view


Here we have the "Emoticons"(Smileys).  I will go into these in a latter post, but basically they are provided so you can show some emotion in your posts.  (One caution lots of icons slow page loading so don't go crazy on these.)


Here we have the next to last part of the Post Box.

The "Green Arrow" points to the "Preview button".  You should always use this to look at your post and make sure links, images, etc. look and work properly.

The "Blue Arrow" points to a text link "Attachments and other options" to open another menu with a few options(See last image in post.).

And finally we have the "Red Arrow" which points to the "Post button" which posts your post on the forum.


Here we have the last bit of the post box.  The menu which opens if you click the text link "Attachments and other options" the "Blue Arrow" points to as noted in the image above.

In the image below the "Red Arrow" points to "Notify me of replies." Check box so you will get a notice someone has replied to your post.   This is a good option if your looking for quick info back from one of your posts.

The "Green Arrow" points to the "Return to this topic." check box.  This is a good option if you want to continue reading the topic as you will stay on the topic rather than going back to the section the topic is in.

The "Blue Arrow" points to the "Don't use smileys." check box.  This is to disable Smileys(Emoticons) in your post.


Offline Sar-Net

  • Jr. Member
  • **
  • Posts: 457
  • Activity:
    0%
  • KARMA: 3205
3.) Adding Text to your posts, Text formatting tools
« Reply #3 on: October 27, 2014, 10:56:32 am »

Adding Text to your posts, Text formatting tools.


In this post I will describe the text posting tools I listed in the Features of the Post Box.
Information for other options will be listed in other posts in this guide.


Please remember to use the Karma system and the Applaud link at the right side under the posters nick to express your thanks for any significant posts, rather than cluttering up the forum with a bunch of one liners, etc.  Remember the karma system is in place to help the site load faster as extra extraneous posts slow topic loading.   

That said, no one wants to stop free expression or posts with significant information in them.  Please think when you post.   Ask yourself "Am I expressing something people will want to know?".   Ask yourself "Am I just wasting space cluttering the forum with extra posts that add nothing to the topic?".

Note these tools are designed to let the user enhance and highlight significant points in their posts.  Overusing the tools makes them loose effectiveness and can also annoy those who are reading your posts.  So please use them sparingly and wisely.

Remember once you are familiar to these options you can actually put the formatting options in directly.  I will show each feature as text with extra spaces so you can learn each option.


Here I will go over each of the text formatting icons in the above graphic by number and and provide a sample of it in use.  These first eleven icons are pretty basic and somewhat self explanatory, so I will be fairly brief.

1.) Bold - This icon adds the [ b ] and [ /b ] before and after selected text.  This is what the option looks like in use Bold.

2.) Italic - This icon adds the [ i ] and [ /i ] before and after selected text.  This is what the option looks like in use Italic.

3.) Underline - This icon adds the [ u ] and [ /u ] before and after selected text.  This is what the option looks like in use Underline.

4.) Strike through  - This icon adds the [ s ] and [ /s ] before and after selected text.  This is what the option looks like in use Strike through.  (I use this to block out old URL's when I update them.)

5.) Preformatted text - This icon adds the [ pre ] and [ /pre ] before and after selected text.  This is what the option looks like in use.   (This option is useful when cutting and pasting from another page or document with formatted text.)

 
Preformatted text


6.) Left justify - This icon adds the [ left ] and [ /left ] before and after selected text.  This option lines up every thing to the left side of the page.  (This is also the standard format.)

Left justify
Left justify
Left justify
.

7.) Center - This icon adds the [ center ] and [ /center ] before and after selected text.  This option centers everything and  looks like this.

Center
Center
Center

8.) Right justify - This icon adds the [ right ] and [ /right ] before and after selected text.  This option lines up everything on the right side of the page and looks like this.  (Over all I don't see a lot of use for this one on the forum.)

Right justify
Right justify
Right justify

9.) Font face - This icon adds the [ font=xxx ] and [ /font ] before and after selected text.  This option changes the font and looks like this in a sentence.  (Overall I would say to limit use of this option as its more for drawing attention to something important.)

Font face courier
Font face arial
Font face arial black
Font face impact
Font face verdana
Font facetimes new roman
Font face georgia
Font face andale mono
Font face trebuchet ms
Font face comic sans ms

10.) Font size - This icon adds the [ size=xxx ] and [ /size ] before and after selected text.  This option changes the font size and looks like this in use.  (Overall I would say to limit use of this option as its more for drawing attention to something important.)

Font size 8pt
Font size 10pt
Font size 12pt
Font size 14pt
Font size 18
Font size 24
Font size 36

11.) Change color - This icon adds the [ color=xxx ] and [ /color ] before and after selected text.  This option changes the color of your text(See Bellow for examples of each color the forum supports.   (Overall I would say to limit use of this option as its more for drawing attention to something important.)

Change color black (This one is not a lot of use on the forum unless you want to hide your text.)
Change color red
Change color yellow
Change color pink
Change color green
Change color orange
Change color purple
Change color blue
Change color beige
Change color brown
Change color teal
Change color navy
Change color maroon
Change color limegreen
Change color white


Some of these are more advanced options and I will provide a bit more explanation for some of them as well as a sample of each.

6.) Glow - This icon adds the [ glow=red,2,300 ] and [ /glow ] before and after selected text.  This is what the option looks like in use.  (Overall I would say to limit use of this option as its more for drawing attention to something important.)

 Glow

7.) Shadow - This icon adds the [ shadow=red,left ] and [ /shadow ] before and after selected text.  This is what the option looks like in use.  (Overall I would say to limit use of this option as its more for drawing attention to something important.)

 Shadow.

8.) Marquee - This icon adds the [ move ] and [ /move ] before and after selected text.  This is what the option looks like.   (Overall I would say to limit use of this option as its more for drawing attention to something important.)
 Marquee

9.) Superscript - This icon adds the [ sup ] and [ /sup ] before and after selected text.  This is what the option looks like in use Superscript.  (This is really of minimal use on the forum.)

10.) Subscript - This icon adds the [ sub ] and [ /sub ] before and after selected text.  This is what the option looks like in use Subscript.   (This is really of minimal use on the forum.)

11.) Teletype - This icon adds the [ tt ] and [ /tt ] before and after selected text.  In this option text is displayed in a fixed-width teletype font.   (This is really of minimal use on the forum.)

Teletype

12.) Insert table - This icon adds the [  TABLE ] and [ / TABLE ] before and after selected text.  This option allows you to add a table in your post.  This is an advanced command and is not recommended for novice users.    To generate a table you will need to create code that looks something like this(See Example 1) minus the extra spaces.    This creates a two column table with 3 rows(See Example 2.).  A table is useful to display a list of items and corresponding info.  An example of use on the forum would be to list contestants and their placings in a Female Body Building contest(See Example 3).  (Note forums only support a minimum table feature, many html table options are not replicated.)

Example 1
[ TABLE ]
[ TR ][ TD ][ b ][ u ]Head 1[ /u ][ /b ][ /TD ][ TD ]    [ /TD ][ TD ][ b ][ u ]Head 2[ /u ][ /b ][ /TD ][ /TR ]
[ TR ][ TD ]Column 1 data 1[ /TD ][ TD ]    [ /TD ][ TD ]Column 2 data 1[ /TD ][ /TR ]
[ TR ][ TD ]Column 1 data 2[ /TD ][ TD ]    [ /TD ][ TD ]Column 2 data 2[ /TD ][ /TR ]
[ TR ][ TD ]Column 1 data 3[ /TD ][ TD ]    [ /TD ][ TD ]Column 2 data 3[ /TD ][ /TR ]
[ /TABLE ]

Example 2
Head 1    Head 2
Column 1 data 1    Column 2 data 1
Column 1 data 2    Column 2 data 2
Column 1 data 3    Column 2 data 3

Example 3
Contestant                   place
Shannon Courtney    1
Mavi Gioia    2
Sophie Arvebrink     3

13.) Insert code - This icon adds the [ code ] and [ /code ] before and after selected text.  This is what the option looks like in use(Click the [Select] link to see code that has been posted.).  (The are only two places on the forum you should in general use this option.   One in the "General Chat" section of the forum when providing error code info on a computer problem.   And two when creating a topic in the "All rules and guidelines - FAQ" reporting an error report code from the forum.) (You can generally forget about 401 and 503 errors as those are generally caused by to many users trying to use the forum at the same time or in some cases web congestion.)

Code: [Select]
Insert code
14.) Insert quote - This icon adds the [ quote ] and [ /quote ] before and after selected text.  This is what the option looks like in use.  (The forum provides an easy way to "Quote" a post at the top right corner of the post with the "Quote" link.)

Quote
Insert quote


16.) Insert unordered list - This icon adds the [ list ] and [ /list ] before and after selected text.  This is what the option looks like in use.

  • Insert unordered list

17.) Insert ordered list - This icon adds the [ list type=decimal ] and [ /list ] before and after selected text.  This is what the option looks like in use.

  • Insert ordered list

18.) Horizontal rule - This icon adds Horizontal rule to your post.  This is what the option looks like.


19.) Remove formatting - This icon Removes all formatting from selected text.  This is useful if you cut and paste into your post and get extra coding you don't want.   

Before Remove formatting.
Contestant                   place
Shannon Courtney    1
Mavi Gioia    2
Sophie Arvebrink     3

After Remove formatting.
Contestant                   place
Shannon Courtney    1
Mavi Gioia    2
Sophie Arvebrink     3


20.) Toggle view - This icon changes the post box from the normal white text on charcoal to black text on white.  This only affects the post box.   This maybe easier for a few people to see the text they are typing.   Overall I would not recommend using this option as it is much harder on the eyes to use a white background. (See Images below for change.)

Standard      Toggle view


Offline Sar-Net

  • Jr. Member
  • **
  • Posts: 457
  • Activity:
    0%
  • KARMA: 3205
4.) Using the Post Box Emoticons
« Reply #4 on: October 27, 2014, 11:19:36 am »

Using the Post Box Emoticons.


These Emoticons are provided so users may express feelings simply in their posts.


Please use these in moderation as too many graphics even simple ones slow page loading.

Please remember to use the Karma system and the Applaud link at the right side under the posters nick to express your thanks for any significant posts, rather than cluttering up the forum with a bunch of Emoticons.  Remember the karma system is in place to help the site load faster as extra extraneous posts slow topic loading.   

That said, no one wants to stop free expression or posts with significant information in them.  Please think when you post.   Ask yourself "Am I expressing something people will want to know?".   Ask yourself  "Am I just wasting space cluttering the forum with extra posts that add nothing to the topic?".

Note these icons are designed to let the user enhance and highlight significant points in their posts.  Overusing the tools makes them loose effectiveness and can also annoy those who are reading your posts.  So please use them sparingly and wisely.


Use of Emoticons are real simple just click on an emoticon and a code will be inserted into your post to cause the Emoticon to be displayed.  (See  Examples below.)

Code in post box : cool2 :    Emoticon shown in post    :cool2:


Offline Sar-Net

  • Jr. Member
  • **
  • Posts: 457
  • Activity:
    0%
  • KARMA: 3205
5.) Adding Images to your post
« Reply #5 on: October 27, 2014, 11:20:48 am »

Adding Images to your post.


In this post I will go over one of the major items people should post on the forum and that is images.
There are several ways to add an image or images to your post.


Please make sure you have read Forum Rules before making any posts.

Please review the list of BANNED HOSTS
Make sure you do NOT use them.
Note the list is subject to change at anytime, so be sure to watch those sticky posts for updates.


First off I want to mention is that you should download any images you want to post on the forum to your computer and then upload them to an image host.  Direct linking AKA hotlinking is banned on most forums including this one.    When you hotlink you steal bandwidth from the original site, you slow others use of that site, and you also invite the spread of virus, trojans, etc.   Copying links even when they are on approved image hosts is generally frowned upon by most posters since  when you spread their links around you mite cause the links to be taken down, etc.  So download, upload to a host, then post, that way everyone will be happy with your posts.

In other posts you will find info on several other topics related to posting such as file compression in a zip or rar, etc.


Here I will go over uploading images to a couple of different image hosts.   The basic concepts should apply to most image hosts.

First off I will go over hosting an image on ImageBam.

1. Go on the site http://www.imagebam.com/

2. Click on "Add Files" . Dialogue box will open, go to the folder that contains the picture files you want to upload, and select the files you want to upload.

                                                                OR
    Open the folder containing the files you want to upload and drag them to the Imagebam upload box.


3. Select  Family Safe Content.. NEVER SELECT "Adult Content" as this may present distasteful adverts to other users and causes offence. Your post will be deleted.

4. In the Thumbnail Options: drop down box, select the largest size, "300 X 300 (Extra Large)" . If you select small thumb nail, your post will be deleted.
If you want to make a gallery of your post on Imagebam, check the "Put to the gallery" box

5. When you are happy with your selections click "UPLOAD NOW!"

6. When the upload is complete, a new screen appears showing your uploaded thumbnails. Go to the "SHARE" section at the bottom of your uploads.

7.  Copy the code under the section "BB Code" by clicking the "Copy" button and go to Saradas. Go to the topic you wish to add to and click "Reply" and paste the code into the box. Click Preview to see what you will post, edit if you need to, and when happy click"Post".
Or, if no existing topic is present, go to the correct section of the forum and click new topic. Start new topic and paste the code. Click Preview to see what you will post, edit if you need to, and when happy click"Post".

DETAILED SCREEN MOVIE WITH INSTRUCTIONS

<a href="https://www.youtube.com/v/Vn8byBD1qTA" target="_blank" rel="noopener noreferrer" class="bbc_link bbc_flash_disabled new_win">https://www.youtube.com/v/Vn8byBD1qTA</a>

IF YOU NEED full screen: Click on "WATCH ON YOUTUBE" above for full screen within YouTube, or try link below if you cannot see flash image.


Here I will go over another image host Postimg.

First load the Postimg site.
Then click "browse button" to select files. (See iExample 1 bellow arrow 1.)
Then click on the files you want to upload. (you can select an individual file or select a group of them.)
You can ignore the pull down. (See Example 1 below arrow 2.)
Then select if your files are "adult or family safe" (See Example 1 below arrow 3.)
Then click "upload It" button.
A progress indicator will run, then a page will come up with links.
Then you will need to make selections.  (See Example 2 below.)
Then follow the steps below to use this link.

Example 1 - This is the Postimg upload window.


Example 2 -This is a sample of the options to select for thumbnails.


Here is a video for postimg.cc

The arrow and number 2 in the graphic below depicts the image icon.


The more common form of posting images is to use thumbnails.  (Just copy the "thumbnail(S) for use on a forum or BB(Bulletin Board.)" link(s) from your image host to the post box. Thumbnails must be 300 pixels or larger. No full size or hotlinked images from other websites, forums and blogs.

Bellow is an example of a thumbnail image link(See arrow two in first image at end of post.).  Clicking on the thumbnail will pull up the full size image on the image host.


And here we have a group of thumbnails (See the arrow in image 2 at bottom of post for link location in a sample page from an image host.).


Something else you can do when posting sets of photos is to include a zip or rar with the full set of images it makes life easier for others on the forum.    If you need info on adding a file to your post, creating a zip or rar, etc. those topics are covered in other parts of this guide.

Example image host Image 1


Example image host Image 2


Offline Sar-Net

  • Jr. Member
  • **
  • Posts: 457
  • Activity:
    0%
  • KARMA: 3205
6.) List of Image Hosts
« Reply #6 on: October 27, 2014, 11:21:57 am »

List of Image Hosts.


This list provides links to a large number of image hosts so you should be able to find one that works well for you.


Please make sure you have read Forum Rules and Banned Hosts before making any posts.

Note the banned image hosts are subject to change at anytime, so make sure to watch those sticky posts for updates.
 

I have listed the banned image hosts as of the time of this posting below.

http:// www .imagefolks .com/
http:// www .imageporter .com/ 
http:// imgpo .st/
http:// imageheli .com/
http:// imgmoney .com/
http:// imgtiger .com/
http:// imgchili .com/
http:// imgdino .com/
http:// imgserve .net/
http:// imgpony .com/
http:// www .imgbabes .com/
http:// imggoo .com/
http:// imgpaying .com/
http:// imgmaster .net/
http:// imgult .com/
http: //www .imagetwist .com/
http:// imgbar .net/
http:// imgmega .com/


These are recommended image hosts.

http://www.imagebam.com/
http://www.imagevenue.com/
http://imageshack.us/
http://imageshack.com/
http://postimage.org/
http://imgbox.com/
                 

These are additional links to image hosts.  These are provided so you can find a host that will work if the recommended image hosts will not work for you. 

http://pixhost.to/                     
http://www.iforce.co.nz/
http://bayimg.com/
http://www.iimmgg.com/
http://overpic.net/
http://www.dumpt.com/img/
http://imagefra.me/
http://www.use.com/
http://www.lookpic.com/
http://img.acianetmedia.com/
http://www.imgur.com/
http://www.turboimagehost.com/
http://www.imagesocket.com/
http://imageupper.com/
http://www.imagehousing.com/
     

These are links to image gallery sites.  Please do not link directly to images on these sites they are not designed for that.  If you come across a good on topic gallery, post a link to the gallery rather than direct linking to images.

http://www.insta****.com/
http://photobucket.com/
http://www.shutterfly.com/
http://23hq.com/
http://www.weheartit.com/
http://www.snapfish.com/
http://www.bluemelon.com/
http://picturetrail.com/
http://www.dotphoto.com/
http://www.artlimited.net/
http://www.freeimagehosting.net/
http://www.flickr.com/
http://www.fotolog.com/
http://www.slickpic.com/
http://webshots.com/
http://pbase.com/
http://www.smugmug.com/


These are free stock image sites.  Do not link directly to images on these sites as they are not designed for forum use. These are great for backgrounds for the wallpaper makers.   If you come across a good on topic gallery, post a link to the gallery rather than direct linking to images.

http://freerangestock.com/
http://www.rgbstock.com/
http://www.freemediagoo.com/
http://freephotosbank.com/
http://nos.twnsnd.co/
https://www.canva.com/
http://www.bigfoto.com/
http://www.freedigitalphotos.net/
http://commons.wikimedia.org/wiki/Main_page
http://www.dreamstime.com/free-photos


For those who want Anonymous Image Hosting, I spotted this link.  Advanced users only, if there are any problems with forum users seeing your images posts this and any other Anonymous Image Hosting sites mite be banned.  I have not tried the site but they claim "AnonImg provides you with log less image hosting.  When images are uploaded, no IP addresses are stored, and all EXIF data is cleared in order to protect personally identifying information.  Your images are safe from copyright trolls, too.  We will deny any DMCA take down requests we receive, and have done so in the past. "

https://www.anonimg.com/upload.html/

Also they have another service.  Don't use this on the forum as other forum users will get ticked.  I have not tried it but they claim "BurnImg is the most secure way to send images with ease over the surface web.  All images are made non-accessible upon being uploaded (with all EXIF data wiped and no IP logs, the same as AnonImg), and then upon being viewed they are displayed only in base64 (this prevents image caching), then we shred them with a 3 pass data wipe.  Privacy is our main concern here, and we will fight to achieve and maintain just that."  Note just because it is base64 does not mean someone can not save the image when they look at it, only that it will not be in your browsers cache directory.

https://www.anonimg.com/burn/upload.html/


Offline Sar-Net

  • Jr. Member
  • **
  • Posts: 457
  • Activity:
    0%
  • KARMA: 3205
7.) Adding Files and Video to your post
« Reply #7 on: October 27, 2014, 11:22:52 am »

Adding Files and Video to your post


In this post I will go over the second major item people should share on the forum and that is videos and files.  In general the only files most people will be posting on the forum are ZIP's and RAR's with video, image sets, PDF's, etc. in them.  I will go over several ways to add files and video(s) to your posts.  I use zips for the most part so my concepts list ZIP's but RAR's work just as well.  Overall I would not recommend using other file compression types other than ZIP and RAR.  The main reason is these are the most common compressed file formats, and other users of the forum will be most comfortable with them.


Note Flash videos will be covered in another post.  Examples of Flash video sources Youtube, dailymotion, etc.


Please make sure you have read Forum Rules before making any posts.

Please review the Banned file hosts.  I have listed the current banned hosts at the time I am writing this post below.  Please make sure you do not use them.  Note the Banned file hosts are subject to change at anytime, so make sure to watch those sticky posts for updates.

Banned mirroring file hosts.
http: //www .multiupfile .com/  Added 11-04-2014

Banned File hosts
http: //rapidgator .net/
http: //www .tusfiles .net/


Note as people have abused the privilege of using a file host that provides previews of a video it is now required for all video posts to have a preview image.  If there is no preview image, thumbnail image, or both your post will be deleted at the discretion of the Forum Moderators or the Admin.


Motion GIF's of a "moderate size" (A few frames of a low res vid or a scaled down Motion GIF from larger size video.) are currently allowed with your video but you will still need to provide a full size image or a thumbnail image in your video post.  Large motion GIF's really slow topic loading so please don't post large motion GIF's on the forum.  A scaled down Motion GIF thumbnail linking to a full size Motion GIF is allowed in your posts. 

Please do not put in a bunch of motion GIF's in a post, even moderate sized ones, as that will slow topic loading.


In other posts you will find info on creating preview images, thumbnail images, file compression in a ZIP or RAR, cutting large files into pieces for posting, adding text, adding, images, etc.


You should always put a little bit of info in your posts, things like the woman's name, contest name, etc.


Sample post 1
In this first post example I will go over the best way to post a video on the forum. (You can use the same concept for a zip of a set of images, or pdf's, etc.)

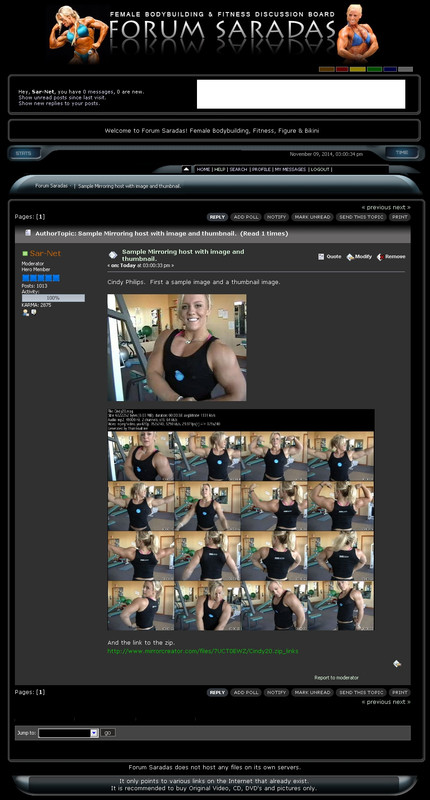
That is with a full size preview image, a thumbnail image, and uploading the video in a ZIP or RAR file on a mirroring file host.  First I will explain the steps used to create this post.  Item E1. shows the icons in the post box used in the sample post.  Then I will explain the steps used in "E2. Detailed description of steps used to upload a file on Mirrorcreator.com."  to upload the zip of the video clip and images.  And then there is "E3. This is how the links will look in a post." which shows how the post I describe here will look when posted on the forum.

These are the steps used to create the post shown in E3 below.
First create a sample image from the video. (I go over how to do this in a latter post.)
Then create a thumbnail image from the video.  (I go over how to do this in a latter post.)
Then create a ZIP file with the two images and the video in it. (I go over creating a ZIP or a RAR several ways in latter posts.)
Then open the post box. (I have gone over this in a prior post.)
Then upload the sample image and thumbnail image to an image host. (I go over posting images in a prior post.)
Then select the "Direct links" on the the image host. (Note not all image hosts support Direct linking to an image.)
Then copy(CTRL C) the links.
Then paste(CTRL V) the links in the post box.
Then select one of the two links in the post box.
Then click on the post box image Icon. (See E1.  Arrow 1 below.)
Then select the other link in the post box.
Then click on the post box image Icon. (See E1.  Arrow 1 below.)
Then upload the zip to a mirroring file host. (See E2. below where I describe how to do this.)(Please make sure to click extra file hosts.)
Then select the host link from the mirroring host. (See E2. Example 2 below.)
Then copy(CTRL C) the file link from the mirroring file host.
Then paste(CTRL V) the file link into post box.
Then select the link in the post box.
Then click on the URL Icon. (See E1. Arrow 2 below.)
Then click the preview button under the post box.
Look over the preview to make sure everything displays properly.
If everything looks good in the preview, images displayed, mirror host zip link clickable, etc.
Then click the Post Button.
And now you have a styling video post. (See E3. below.)
_

E1. Icons to use for this post.

_

E2. Detailed description of steps used to upload a file on host Mirrorcreator.com and example images.  (The basic concepts shown here will apply to uploading a zip or any other file to almost any Mirroring file host.)

First load Mirrorcreator.com in your web browser.
Then click on the big blue button labeled "click here to select files to upload." (Select the zip with your video clip and the two images.) (See Example 1 Arrow 1 below.)
Then select your zip file to upload.
The progress bar will show up on the mirrorcreator page. (See Example 1 Arrow 2 below.)
located in the progress bar is the file name you have just selected to upload. (See Example 1 Arrow 3 below.) 
Then page down on Mirrorcreator and click the extra file hosts check boxes (See Example 1 Arrow 4 below.)
You will get a little popup when you have the max number of file hosts selected. 
(Popup says "Sorry, You may only select a maximum of 12 mirrors at a time!")
(Remember not to use file hosts that require membership unless you are a member and have logged in to Mirrorcreator.  These links will not work for a free user.  So you will just be wasting host slots if you use them.  The file hosts that require membership are listed at the end of the file host check boxes. (See Example 1 Arrow 5.).
Then page down and click the start uploading button. (See Example 1 Arrow 6 below.)
Depending on the size of the file and the speed of your upload, you may have a bit of a wait.
You can go do something else while the upload runs.
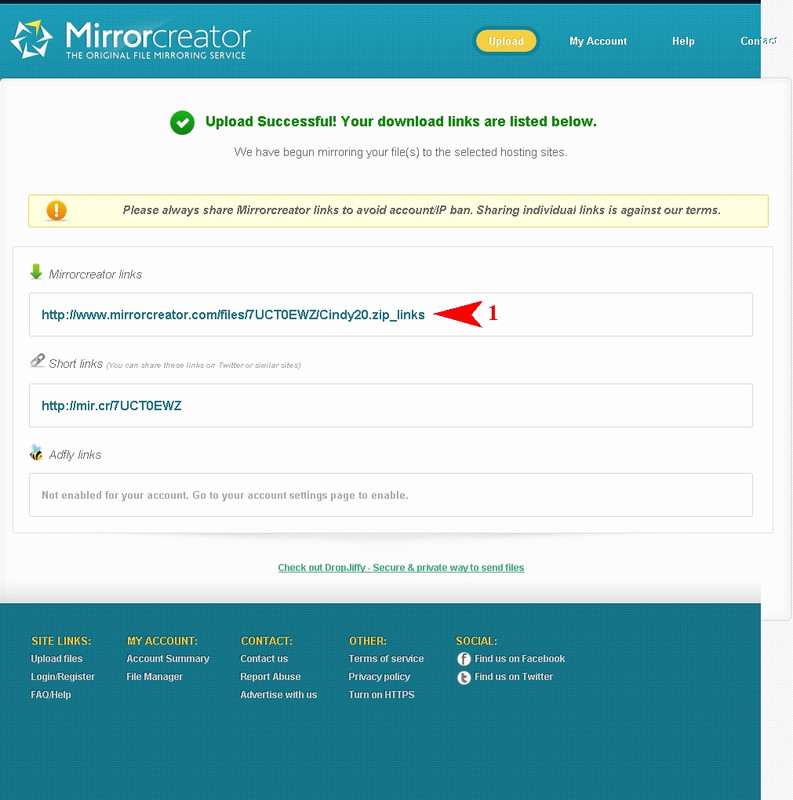
A page will come up with links to paste on the forum. (See Example 2 below.)
Now just copy the link into your post. (See Arrow 1 in Example 2 below for the standard link.)
That's it, pretty easy isn't it?
_

Example 1 Mirroring file host upload page.
[img width 600]http://s28.postimg.cc/jw3d1onu5/Mirrorcreator_Upload_files_page.jpg[/img]
_

Example 2 Mirroring file host links page.
_

Example 3 This is how the links will look in a post.


Sample 2
In this post example I will go over another way to post a video on the forum. 

This is a slightly simpler post, just a thumbnail Image and a regular host link to a zip.  In this example I will use the file host zippyshare.com.  (I will simplify this this by leaving some of the excess comments and examples as they are covered in Sample 1 the first post described on this page.)

These are the steps used to create the post shown below.
First create a thumbnail image from the video.
Then create a ZIP file with the thumbnail image and the video in it.
Then open the post box.
Then upload the thumbnail image to an image host.
Then select the "Direct link" on the the image host.
Then copy(CTRL C) the links from the mirroring host.
Then paste(CTRL V) the links in the post box.
Then select the image link in the post box.
The click on the post box image Icon.
Then upload the zip to a file host. (See E1. below for info.)
Then select the host link on the file host.
Then copy(CTRL C) the file link.
Then paste(CTRL V) the file link into post box.
Then select the link in the post box.
Then click on the post box URL Icon.
Then click the preview button under the post box.
Look over the preview to make sure everything displays properly.
If everything looks good in the preview, images displayed, mirror host ZIP link clickable and pulls up the file host, etc.
Then click the Post Button.
And now you have a basic video in zip with thumbnail post.  (See Example 3 below.)
_

E1.) How to upload using zippyshare.com.  (I recommend you use a mirroring file host as with one upload you have several file hosts.) 

First load zippyshare.com in your web browser.
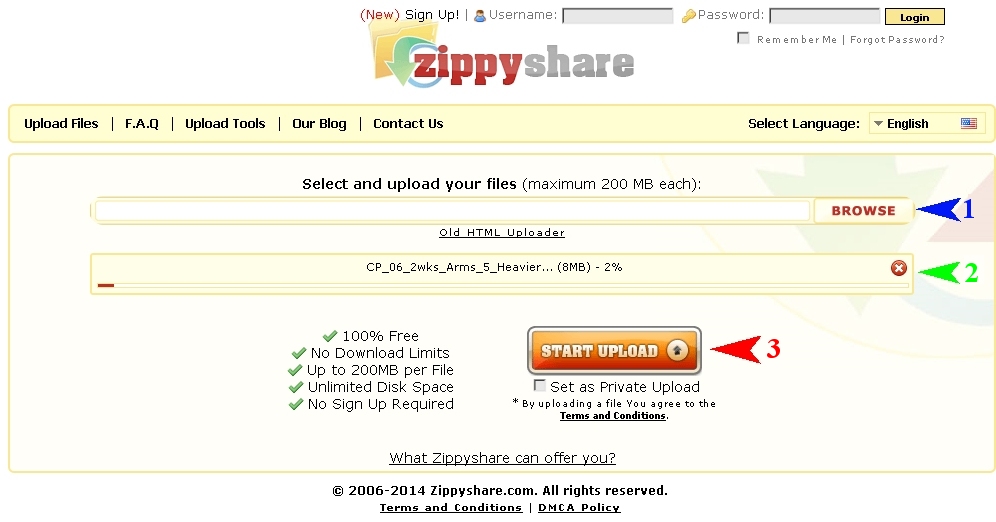
Then click browse. (See Example 1 Arrow 1.)
Then select the file you want to upload.
Then rogress bar with File name will show up. (See Example 1 Arrow 2.)
Then click Upload button. (See Example 1 Arrow 3.)
Then progress bar will run as zip uploads.
This can take a while, depending on files size and upload speed.
You can go do something else and come back.
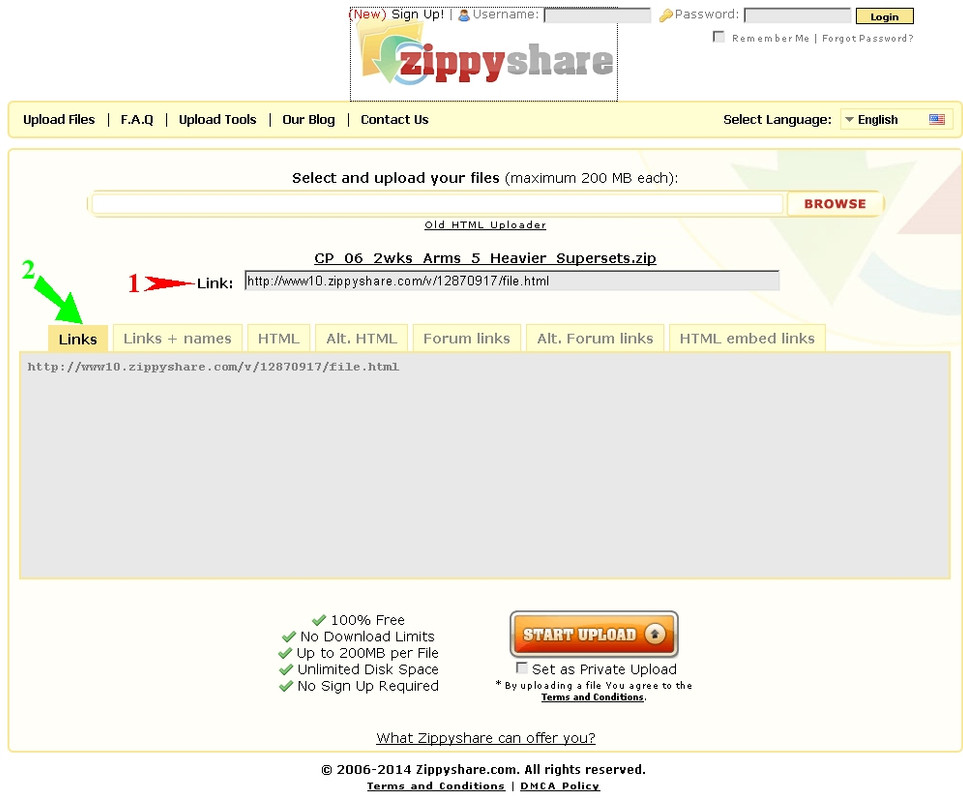
Then the Links will show up.  (See Example 2.)
The simple way is to just copy(CTRL C) the link that pops up. (See Example 2 Arrow 1.)
(Zippy share has some other options for more advanced users. (See Example 2 Arrow 2.)  For instance the "Forum link" will provide a link that will show only the file name of the uploaded file as the link.)
Then click paste(CTRL V) in the post box.
_

Example 1
_

Example 2
[/s]
_

Example 3 Sample of post using zippyshare.com.
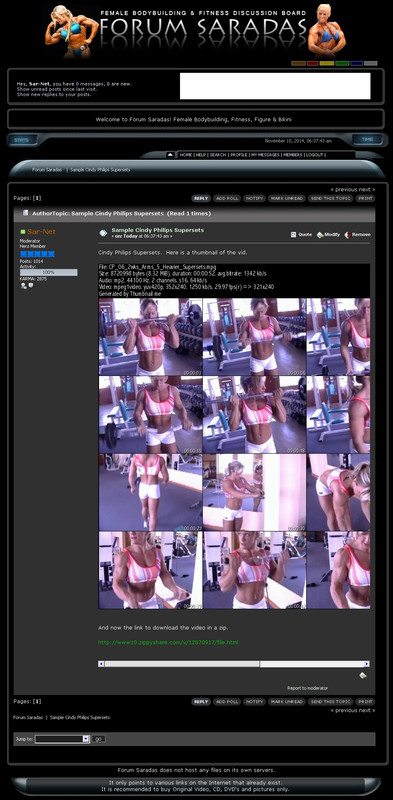

[/s]


Sample 3
Here I will go over a very simple way to post a video or file. (I will simplify this this by leaving some of the excess comments and examples as they are covered in Sample 1 the first post described on this page.)

This is the simplest way to post a video but in general I would not recommend it as these links get removed fairly quickly.  In this example I use the file host Solidfiles.com.  (Overall its best to put a video in a zip with the sample image and/or the thumbnail image.)  (I recommend you use a mirroring file host as with one upload you have several file hosts.) 

First create a sample image from video.
Then upload sample image to image host.
Then select the direct link.
Then copy(CTRL V) the link.
Then paste(CTRL V) the link in the post box.
Then select the link in the post box
Then click on image icon.
Then upload video or file to file host. (I'll describe this below.)
Then paste(CTRL V) the link in the post box.
Then select the link and click on URL icon.
Then click preview.
Look over the preview to make sure everything displays properly.
If everything looks good in the preview, images displayed, mirror host zip link clickable, etc.
Then click the Post Button.
There ya go, a really basic post.[/s]
___

Posting a video or file on Solidfiles.com is really simple.

First off load Solidfiles.com into your browser.
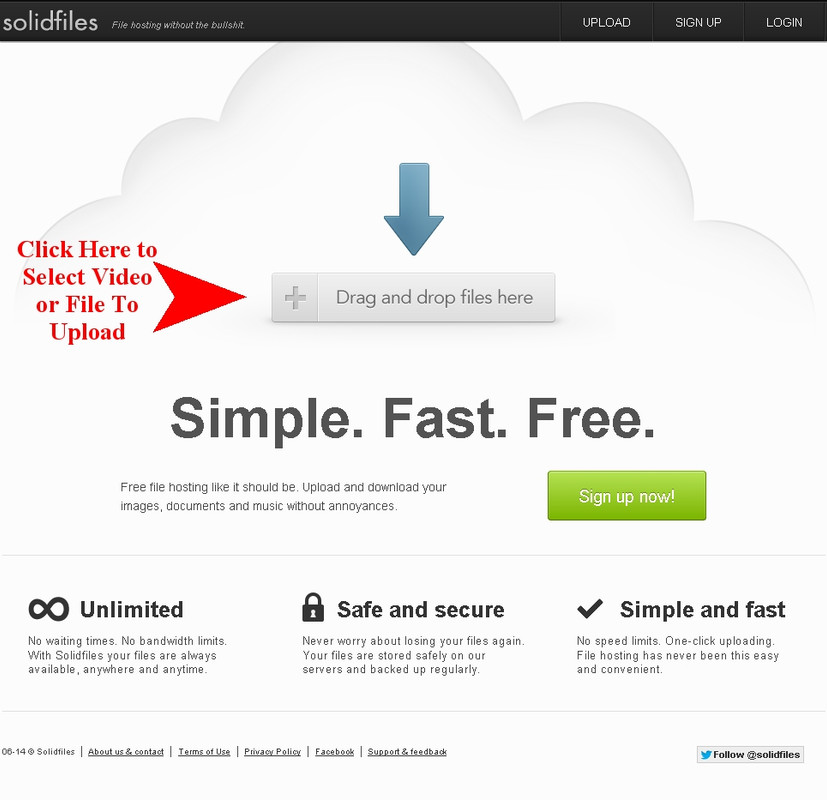
Then drag your file or video over to the solidfiles upload page. (See Example 1 below.)
(You can also click on the "drag and drop files here button" to browse and select a file to upload.)
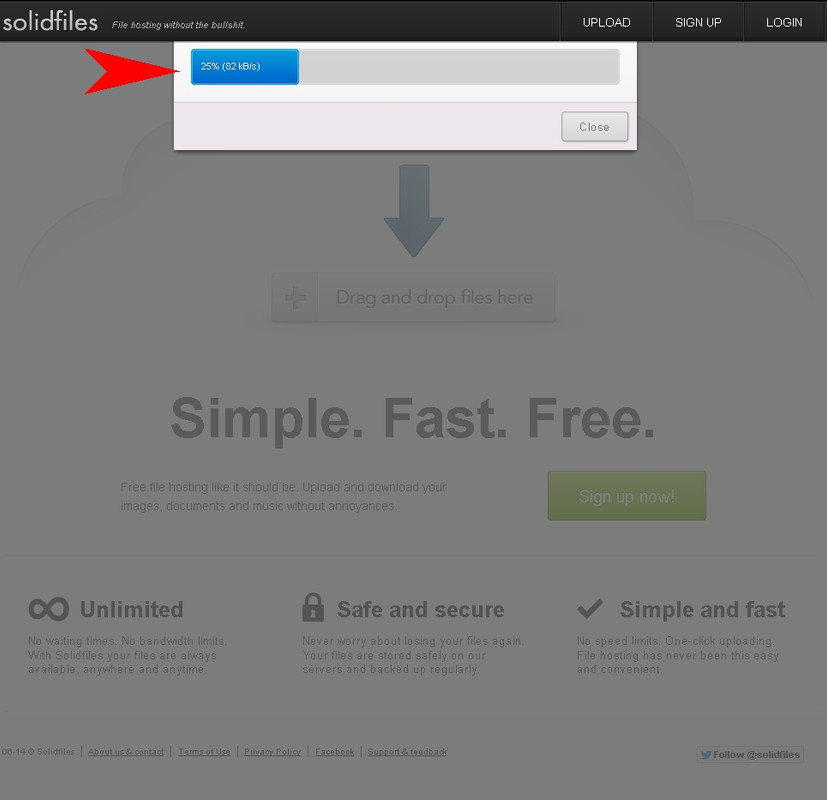
The upload will start automatically once you have dropped/selected the file.
Then the progress bar will display.  (See Example 2 below.)
Depending on size and upload speed it will take a bit for the upload to finish.
Go find something to do.
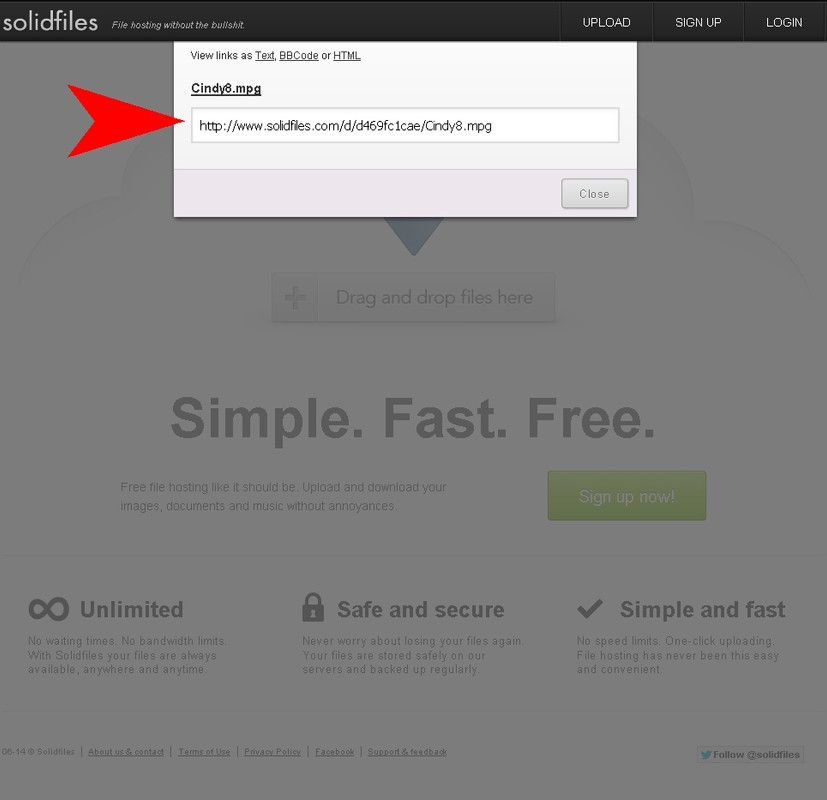
When you come back you will find the link has showed up. (See Example 3 below.)
That's about as easy as a file upload can get.

Example 1
___

Example 2
___

Example 3
___

Example 4
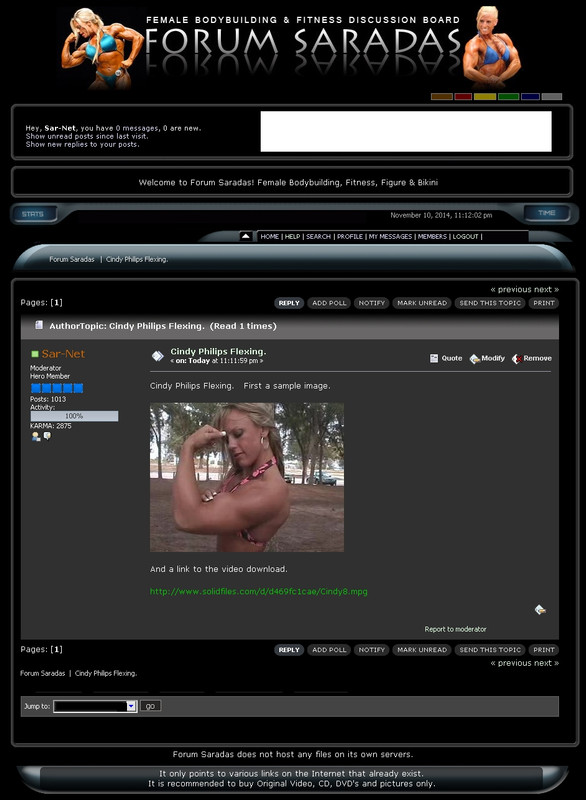


PS. For those who actually read post like these, the Examples of posts are clickable image links and will goto the file hosts listed so you can download the sample videos if you want to.

[/s]


Offline Sar-Net

  • Jr. Member
  • **
  • Posts: 457
  • Activity:
    0%
  • KARMA: 3205
8.) Posting large files and videos in multiple parts.
« Reply #8 on: October 27, 2014, 11:24:10 am »

Posting large files and videos in multiple parts.


In this post I will go over posting a large video in multiple parts on the forum.
In general this is for large videos over say 200meg.

You should be familiar with the concepts in the prior post Adding Files and Video to your post.


Please make sure you have read Forum Rules before making any posts.

Please review the Banned file hosts.  I have listed the current banned hosts at the time I am writing this post below.  Please make sure you do not use them.  Note the Banned file hosts are subject to change at anytime, so make sure to watch those sticky posts for updates.

Banned mirroring file hosts.
http: //www .multiupfile .com/  Added 11-04-2014

Banned File hosts
http: //rapidgator .net/
http: //www .tusfiles .net/


There are several reasons to keep the files you post below 200meg or so.  One reason is because 200meg is about the biggest size a free user can upload on most Mirroring hosts without ending up with some of the file hosts not working.  Many file hosts have a low maximum file size a free user can upload.  If files are too big free users will have trouble downloading them.  Another plus you get from breaking that large file up is that people can use more than one host at the same time and therefore be able to download more than one part of the file at the same time.  Often a person can get two, three, or even four downloads running at the same time.  The number of simultaneous downloads depends on your download speed, system capabilities, and the size of the files being downloaded.  So in effect splitting a large file allows someone downloading your post get the post in half, one third, or even one fourth the time.  So breaking that large file into pieces has a lot of advantages.

As always use your head on things.  If the video is close say 210-220meg go ahead and do it in one chunk.  When you do break up a file make the parts fairly close to equal size, as an example if you break a 360meg file do the parts at 180meg each rather than say 200meg and 160meg as it will help the people who download your post save a little bit of time.


Here I will go over the steps used when posting a large video in multiple parts with a full size preview image, a thumbnail image, and uploading the video in a ZIP file that has been split into several parts and uploaded on a mirroring file host.  First I will explain the steps used to create this post.  Item E1. shows the icons in the post box used in the sample post.  Then I will explain the steps used in "E2. Mirroring Host Description and Example page images."  to upload the zip of the video clip and images.  And then there is "E3. This is how the links will look in a post." which shows how the post will look when posted on the forum.

These are the steps used to create the post shown in E3 below.
(I'm going to use a small vid clip as a sample.  This video would not be one I would normally split.  I'm just using it for an example.)
First create a sample image from the video. (I go over how to do this in a latter post.)
Then create a thumbnail image from the video.  (I go over how to do this in a latter post.)
Then create a ZIP file with the two images and the large video in it. (I go over creating a zip or a rar several ways in latter posts.)
Then you will need to cut the zip into equal parts. (I go over two different apps that do this in latter posts in this topic.) (In this example I used HJ-Split as its small, and simple to use.)
Then open the post box. (I have gone over this in a prior post.)
Then upload the sample image and thumbnail image to an image host. (I go over posting images in a prior post.)
Then select the "Direct link" on the the image host.
Then copy(CTRL C) the links.
Then paste(CTRL V) the links in the post box.
Then select one of the two links in the post box.
Then click on the post box image Icon. (See E1.  Arrow 1 below.)
Then select the other link in the post box.
Then click on the post box image Icon. (See E1.  Arrow 1 below.)
The following steps need to be done for each part of the file.
Then open Mirrorcreator,com in your browser. (You will need do this for each part of the file.) (In the example I make four parts, so I had to do the upload bit four times.)
Then upload one of the the parts of the zip to a Mirrorcreator. (See E2. below where I describe how to do this.) (Please make sure to click extra file hosts.)
(Even though some hosts let you select multiple files I would recommend doing each part separately.  There are a couple of reasons for this.  One is if you upload crashes for some reason you will only loose part of the upload.  Another good reason for this is if part of your upload gets pulled or is corrupted on the host for some reason you may only have to reupload only the part that is gone or bad on the host rather than all the parts.)
Then select the link from each of the mirroring host pages. (See E2. Example 2 below.)
Then copy(CTRL C) the file link from the mirroring file host.
Then paste(CTRL V) the file link into post box.
Then select the link in the post box.
Then click on the URL Icon. (See E1. arrow 2 below.)
Repeat for each file link for each part of the file.
Then click the preview button under the post box.
Look over the preview to make sure everything displays properly.
If everything looks good in the preview, images displayed, all mirror host zip links clickable, etc.
Then click the Post Button.
And now you have a styling large file\video post. (See E3. below.)
_

E1. Icons to use for this post.

_

E2. Mirroring Host Description and Example page images.
Uploading each part of the zip to Mirroring file host Mirrorcreator.com
You will need to do this for each part of your zip.  (In the case of this example I split a file into 4 parts.)

First load Mirrorcreator.com in your web browser.
Then click on the big blue button labeled "click here to select files to upload."
Then select a part of the zip.
If you look at Example 1 arrow 2 below you will see the progress bar.
located in the progress bar is the file name you have just selected to upload. (See Example 1 arrow 3 below.) 
Page down on Mirrorcreator and click the extra file hosts check boxes (See Example 1 Arrow 4 below.)
You will get a little popup when you have the max number of file hosts selected. 
(Popup says "Sorry, You may only select a maximum of 12 mirrors at a time!")
Remember not to use file hosts that require membership unless you are a member and have logged in to Mirrorcreator.  As these links will not work for a free user, so you will just be wasting host slots.  The file hosts that require membership are listed at the end of the file host check boxes. (See Example 1 Arrow 5.).
Then page down and click the start uploading button. (See Example 1 Arrow 6 below.)
Depending on the size of the file and the speed of your upload, you may have a bit of a wait.
You can go do something else while the upload runs.
A page will come up with links to paste on the forum. (See Example 2 Link 1-4 below.)
Now just copy the links from each upload into your post.

_

Example 1 Mirroring file host upload page.

_

Example 2 The four Mirroring file link pages.

Link1


Link 2


Link 3


Link4

_

Example 3 This is how the links will look in a post.


PS For those who actually read things, the above sample post has 4 links embedded in it if you want the video clip I use as a sample.


Offline Sar-Net

  • Jr. Member
  • **
  • Posts: 457
  • Activity:
    0%
  • KARMA: 3205
9.) Making video image previews from videos - Various media players
« Reply #9 on: October 27, 2014, 11:25:04 am »

Making video image previews from videos - Various media players.


Here I will describe a couple of the more common video players and how to create images caps from videos with them.  Most addin players have similar features, sadly Microsofts media player doesn't and their work around screen caps are not that great a way to do things.  For those on a MAC one of the players I list here VLC has a MAC version and I put a little bit I gleaned from the web for QuickTime player at the end.

Window(s) media player(S) will be covered in another post.


In this first example I will talk of the player I use VLC Media player.  VLC has versions for windows, MAC, and Linux.  I like VLC because it is fast, has low overhead and has lots of options so it will work properly on lots of hardware.   Note VLC is also available for MAC and Linux.   I can not speak of its usability on a MAC as I don't have a MAC.  On Linux I can't recommend VLC as your primary video player.  It does not seem to work as well as the default Linux video player in several versions of Linux I have tried it on.

You can get VLC direct from videolan.org

Or you can get VLC for windows from VLC Windows download from CNET

Or for a Mac you can get VLC from VLC MAC download from CNET

Or for Linux you can get VLC from VLC Linux download from CNET
 
And here is short a Youtube video showing image capture with VLC.
__

First you need to configure VLC.  These steps will only need to be done once.   To configure the snapshot image format.

First off you need to open VLC.
Then you need to click on "Settings" on the menu bar. (See Example 1.)
Then click on "Preferences". (See Example 1.)
Then click on "Video".  (See Example 2.)
Then set the "Video snapshot directory".  (See Example 2 Arrow 1.) (This where you want to put your created images.  I put mine in a dir/folder called post as that's where I put stuff I'm going to upload.)
Then set a "Video snapshot file prefix"  (See Example 2 Arrow 2.)
Then set the "Video snapshot format" to "JPG".  (See Example 2 Arrow 3.)
I would also check the "Use sequential numbers instead of timestamps". (See Example 2 Arrow 4.)
Then click "save" button and your ready to cap images from videos.

Example 1


Example 2

__

How to cap an image in VLC.

First off you need to open VLC.
Then select and load the video you want to make an image cap from.
Then "Slow" the playback of the video. (See Example 1.)
Then "Pause" the video on the image you want to cap. (See Example 2.)
Then click on the menu "Video" then click on "Snapshot". (See Example 3.)
Now you can close VLC.
The image you capped will be in the location you selected in "Preferences" above. (See Example 4 for sample image.)

Example 1


Example 2


Example 3


Example 4 Image


Media Player Classic(Not a Microsoft App.).

You can download MPC from MPC-HC.org.

Or you can download MPC from OLD MPC

Or you can download newer MPC-HC from MPC-HC

Here is a video showing how to capture an image in MPC.

Using Media player classic(MPC) to create sample images.

First you will need to change some options so you will not be using overlay which will allow saving an image to work.  You will only need to do this once.

First open MPC. (See Example 1.)
Then select options under the view menu. (See Example 2.)
Then select output under playback. (See Example 3.)
Then select the vm9 windowed rather than overlay. (See Example 3.)
Then click "Apply". (See Example 4.)
Then click "OK". (See Example 5.)
Now MPC is ready to save images from videos.

Example 1


Example 2


Example 3


Example 4


Example 5


__

Now I will go over actually saving an image from a video in MPC.

First open MPC. (See Example 1.)
Then click open file on the "File menu". (See Example 2.)
Then select the file you want to capture an image from. (See Example 3.)
Then  click OK. (See Example 4.)
Your video will start playing.
Then click the "Decrease speed" to slow video playback. (See Example 5.)
Then click on "Pause" to stop the video on the image you want to capture. (See Example 6.)
Then click "Save image" on the "File menu". (See Example 7.)
Now you can close MPC as your done.
The image will be in the directory/folder you saved it in. (See Example 8 for sample image from MPC.)


Example 1


Example 2


Example 3


Example 4


Example 5


Example 6


Example 7


MAC QuickTime player.  (Note I don't have access to a MAC at the moment to test this but I did some research and this should work for you?)

Open the QuickTime X Player.
Then load the video you want an image capture from. (See Example 1 for player with simulated video.)
Then chose View -> Actual Size
Then pause the video on the image you want to capture.
Hold down the "Command" key, and click on the video with your mouse.
This removes the "player controls" showing in your video. (See Example 2 below.)
Then Press "Command" "Shift" "4" all at the same time on your keyboard.
Then click the "Spacebar".
Your cursor should change to a camera.
Then Click your mouse on the video window to capture.
When you release the mouse button, an image file will be written to your desktop.
You can exit QuickTime player as your done capping an image.

Example 1


Example 2


Offline Sar-Net

  • Jr. Member
  • **
  • Posts: 457
  • Activity:
    0%
  • KARMA: 3205
10.) Making video image previews from videos - Windows Media player
« Reply #10 on: October 27, 2014, 11:26:08 am »

Making video image previews from videos - Windows Media player.


Here I will describe using windows media player to create image captures.

My personal opinion is not to use windows media player to capture an image from a video as there are much better programs to use.  Microsoft does not go into much detail on capping an image from a video on its web pages as I think they really don't want you to do it.

Due to the vast number of different versions of windows including both retail and OEM, etc. etc. etc., different versions of media player, different video cards and the drivers/patches they make to windows and its apps, etc.  there is no way for me to completely cover all the different things you may have to deal with to capture images from Microsoft window(s) media player(s).

I will do my best to do a fairly complete concept of saving an image from a video in windows media player that will work for most users.  If none of this works for you you can use Microsoft's Idea I present at the end of this post. (I am not thrilled by their attitude about this topic you will see why at the end.)  Or for a much better Idea you can use one of the players I mentioned in the previous topic.


First off to capture an image from a video in windows media player you will need to turn off overlay or turn off acceleration.  Which you need to do depends on windows version, and video drivers/patches, etc.   In the two examples bellow I will show you the media player options so you can see what to turn off.  The majority of windows users from win9x-win8.1 will have one of these two options in media player.  In general you will have to turn off overlay or acceleration for all the methods I show here to capture an image.

Example 1.


Example 2


Now once you have the option turned off that applies to your version of media player and windows.


Again depending on version of windows, media player etc. you maybe able to click one of several key combos on your keyboard and then paste the image into paint or your favorite image editor to save it.  Once you have figured out which way you need to use to create an an image you can crop it to remove any excess player borders, etc. or you can cap the image with media player set to play the video full screen.

To save an image from media player you will need to do the following.
First open Media player.
Then open the video you want an image from.
Then pause media player on the image you want to cap.
Then click "Print Screen" on your keyboard. (See image below for Key to press.)
Then open windows paint or your favorite image editor and paste.
You should end up with your screen cap in Paint or your editor.
Then save the image.
If every thing works your ready to go.


__

If that does not work try this.
First open Media player.
Then open the video you want an image from.
Then pause media player on the image you want to cap.
Then click "CTRL" and "I"  at the same time on your keyboard. (See image below for Keys to press.)
Then open windows paint or your favorite image editor and paste.
You should end up with your screen cap in Paint or your editor.
Then save the image.
If every thing works your ready to go.


_

If that does not work try this.
First open Media player.
Then open the video you want an image from.
Then pause media player on the image you want to cap.
Then click "ALT" and "Print Screen"  at the same time on your keyboard. (See image below for Keys to press.)
Then open windows paint or your favorite image editor and paste.
You should end up with your screen cap in Paint or your editor.
Then save the image.
If every thing works your ready to go.


_

If that does not work try this.
First open Media player.
Then open the video you want an image from.
Then pause media player on the image you want to cap.
Then click "CTRL" and "Print Screen"  at the same time on your keyboard. (See Example 5 for Keys to press.)
Then open windows paint or your favorite image editor and paste.
You should end up with your screen cap in Paint or your editor. (See Example 6.)
Then save the image.
If every thing works your ready to go.


_

To save an image from media player on a laptop you may need to do the following.
First open Media player.
Then open the video you want an image from.
Then pause media player on the image you want to cap.
Then click "Function" and "Print Screen" at the same time on your keyboard. (See image below for Keys to press.)
Then open windows paint or your favorite image editor and paste.
You should end up with your screen cap in Paint or your editor.
Then save the image.
If every thing works your ready to go.


____

In windows 8/8.1 they finally got the screen cap bit right as it will capture direct to an image file. 
 
First open Media player.
Then open the video you want an image from.
Then pause media player on the image you want to cap.
You push the "Windows" and "Print Screen" keys at the same time. (See Example 1 for keys to press.)
The image will be saved to in the Screenshots folder (which is in your Pictures folder).
If every thing works your ready to go.

Example 1


Now it is still possible you have not been able to get an image captured.  So you have the next method to get an image the windows sniping tool.  This may or may not be on your version of windows Vista threw Win 8_1 depending on version, OEM, etc.

Here is a Youtube video on using the snipping tool.  While the video is not specifically for video capture it will work to show you how the snipping tool works.

First open the snipping tool. (See Example 1.)
Then open media player. (See Example 2.)
Then open the video you want an image from.
Then select pause on the part of the video you want to capture.
Then select snipping tool.
Then select shape of snip. (See Example 3.)
Then select media player.
Then right click and outline the area to snip. (See Example 4.)
When you release the right mouse button the snip will be automatically created.
Then select the sniping tool window.
Then save your image. (See Example 5.)

Example 1


Example 2


Example 3


Example 4


Example 5


If all that mess does not get you a screen cap you can use the following suggestion from Microsoft.

Microsoft says you can use a screen capture application if none of these work.    :angry:

I say that they should have a menu option in media player to cap an image no matter which video drivers your computer uses.


Offline Sar-Net

  • Jr. Member
  • **
  • Posts: 457
  • Activity:
    0%
  • KARMA: 3205
11.) Making video thumbnail images from videos
« Reply #11 on: October 27, 2014, 11:26:58 am »

Making video thumbnail images from videos.


These Apps will take a video and make thumbnail image sheets on a windows PC.


There are similar apps for the MAC OSX.  I will list a few of them at the end of this post.


First off I will go over Thumbnail Me.

You can download Thumbnail me form their web site.

Or you can get it from Sourceforge.

Here I will use Thumbnail Me to create a thumbnail image.

First start Thumbnail Me.
Then load video(s) to thumbnail. (See Example 1.)
Then set the rows and columns and image size. (See Example 2.)
Then click preview. (See Example 3.)
Check out the sample image thumbnail image.
If it looks good then click start. (See Example 4.)
Your thumbnail(s) image(s) will be crated. (See Example 5.)
You can close Thumbnail Me your done.
The images will be in the directory you selected the video(s) from.
You can also set a different directory/folder for the thumbnail image(s).

Example 1


Example 2


Example 3


Example 4


Example 5


Media player classic HC (Not a Microsoft App.) also makes thumbnails.

You can download MPC-HC from MPC-HC.org.

Or you can download MPC-HC from Sourceforge.

Here is a video showing how to capture a thumbnail image in MPC-HC.
__

Using Media player classic HC (MPC-HC) to create thumbnail images.

First you will need to change some options so you will not be using overlay which will allow saving a thumbnail image to work.  You will only need to do this once.

First open MPC-HC. (See Example 1.)
Then select options under the view menu. (See Example 2.)
Then select output under playback. (See Example 3.)
Then select the vm9 windowed rather than overlay.
Then click "Apply".
Then click "OK".
Now MPCHC is ready to save images from videos.

Example 1


Example 2


Example 3


__

Using Media player classic HC (MPC-HC) to create thumbnail images.

First open MPC. (See Example 1.)
Then click open file on the "File menu".
Then select the file you want to capture an image from.
Then  click OK.
Your video will start playing.
Then click the "Decrease speed" to slow video playback.
Then click on "Pause" to stop the video on the image you want to capture. (See Example 2.)
Then click "Save thumbnail" on the "File menu". (See Example 3.)
Then select a file name for your thumbnail image. (See Example 4.)
Now you can close MPC as your done.
The image will be in the directory/folder you saved it in. (See Example 5 for sample image from MPC.)

Example 1


Example 2


Example 3


Example 4


Example 5 Sample thumbnail image.


Thanks go to Female Bodybuilding for providing the app information and images used in this description.

CheshireCat'­s One Click Thumbnailer­ Download Mediafire.

As you can see from the images below CheshireCat'­s One Click Thumbnailer looks pretty easy to use.

First load the program.  (See Example 1.)
You can select different settings for image width, thumbnail rows and columns, and thumbnail profile. (See Example 2.)
Then drag a video file into the app. (See Example 3.)
When you release the mouse the progress bar will run. (See Example 4.)
When progress bar is done a preview thumbnail image will show in the app. (See Example 5.)
An image will also be created on your desktop. (See Example 6 Sample thumbnail image.)
You can close the program as your done.

Example 1


Example 2


Example 3


Example 4


Example 5


Example 6 Sample thumbnail image.


Video Thumbnails Maker 

Developer Web Site
Alternate Download videohelp
Alternate download CNet

Note  "Microsoft .NET Framework 4.0 Client Profile" or "Microsoft .NET Framework 4.0+" is required to run the Video Thumbnails Maker.
Microsoft .NET Framework 4 Client Profile (Standalone Installer) (Use this one unless you write software.)
Client Profile.
Alt download CNET

Microsoft .NET Framework 4.5
.Net Framework.
Alt download CNET

Here are links to video examples.
Demo of older version a bit easier to follow.
Video thumbnail extraction from Developer Web Site.

First off you need to set a folder to save your thumbnails in.

First open the App.
Then click options.
Then set the save thumbnails folder.
Then click save.

Example 1


__

There are other options you may want to configure.

Such as Rows and Columns in your image.


Such as using a special matrix for your thumbnail.


This is a selection of the different matrix layouts.

__

On to using the App to create thumbnails.

First load the app. (See Example 1.)
Then select file(s) or a directory to create thumbnail images of. (See Example 1.)
Then click start. (See Example 2.)
Progress bar will run.  (See Example 2.)
Thumbnail image(s) will be created.
You can close the program your done.

Example 1


Example 2


These Apps will take a video and make thumbnail sheets on a Mac OSX.

Skreenics
Download Skreenics
Skreenics alt download

Thumbsup
Download Thumbsup
ThumbsUp alt download

Movies Thumbnails Free


Offline Sar-Net

  • Jr. Member
  • **
  • Posts: 457
  • Activity:
    0%
  • KARMA: 3205
12.) List of Mirroring File and Video Hosts DO NOT USE< NOW BANNED>
« Reply #12 on: October 27, 2014, 11:28:11 am »
PLEASE NOTE. SARADAS NO LONGER SUPPORTS MIRROR SITES. IF YOU POST USING A MIRROR SITE, YOUR POST WILL BE DELETED.  MIRROR SITES ARE NOW BANNED.


List of Mirroring File and Video Hosts.


This list provides links to a large number of mirroring file hosts so you should be able to find one that works well for you.


Please remember when using a mirroring host to select as many file hosts as possible.  You should include the best file hosts on the mirroring host first and then fill out the full number of file hosts with lesser sites.  These lesser sites may work better for people in other areas.  Also please make sure to not use any file hosts that the mirroring host requires you to have a paid membership to use, as you will just be wasting file host slots.


Please make sure you have read Forum Rules and Banned file hosts before making any posts.

I have included the Banned Mirroring hosts below at the time I am writing this.
Make sure you do not use them.
The Banned files hosts are subject to change at anytime.  So make sure to read those sticky's.

Banned mirroring file hosts.
http://www.multiupfile.com/


These are recommended mirroring file hosts.
http://www.mirrorcreator.com/


These are additional links to mirroring file hosts.  These are provided so you can find a host that will work if the recommended image hosts will not work for you.

http://www.digzip.com/
http://www.directmirror.com/
http://www.embedupload.com/
http://calabox.com/
http://exoshare.com/
http://www.massmirror.com/
http://www.gigamirror.com/
http://www.1filesharing.com/
http://go4up.com/
http://upmirror.info/
http://www.maxmirror.com/
http://www.sharebee.com/
http://lilfile.com/
http://www.filedropper.com/
http://mirrorengine.com/
http://www.multi-up.net/
http://www.mirrorupload.net/
http://multiupload.biz/
http://qooy.com/
http://uploadmirrors.com/
http://www.uploadonall.com/
http://www.uploadseeds.com/
http://upmirror.info/


Offline Sar-Net

  • Jr. Member
  • **
  • Posts: 457
  • Activity:
    0%
  • KARMA: 3205
13.) List of Standard File and Video Hosts
« Reply #13 on: October 27, 2014, 11:29:09 am »

List of Standard File and Video Hosts.


This list provides links to a large number of file hosts so you should be able to find one that works well for you.


Please make sure you have read Forum Rules and Banned file hosts. before making any posts.

Note the banned file hosts are subject to change at anytime, so make sure to watch those sticky posts for updates.

I have listed the banned file hosts at the time I write this below.  Do not use them.

http :// www . tusfiles . net/


These are recommended file hosts.

https://mega.nz/
http://www.mediafire.com/


These are additional links to file hosts.

These are provided so you can find a host that will work if the recommended file hosts will not work for you. 

These are some of the more common file hosts.


http://1fichier.com/
http://www.megashares.com/


These are lesser known file hosts.

These are provided so you can find a host that will work if the recommended or more common file hosts will not work for you. 

http://www.depositfiles.com/
http://www.4shared.com/
http://bitshare.com/
http://www.uploaded.net/
http://filespace.com/
http://www.filefactory.com/
http://www.sendspace.com/
http://www.crocko.com/
http://uploaded.net/
http://keep2share.cc/
http://www.speedyshare.com/
http://www.filefactory.com/
http://turbobit.net/
http://www.tinyupload.com/
http://www.filehosting.org/
http://wm.shareflare.net/
http://hitfile.net/
http://www.filesdirect.com/
http://ge.tt/
http://www.senduit.com/
http://www.datafilehost.com/
http://www.yourfilelink.com/
http://filerio.in/
http://www.fastshare.org/
http://www.filedropper.com/
https://www.transferbigfiles.com/
http://www.ultrashare.net/
http://www.yousendit.com/
http://www.gigasize.com/
http://www.ziddu.com/
http://www.1filesharing.com/
http://www.come2store.com/
http://www.sendspace.pl/
http://www.netload.in/
http://www.yourfilelink.com/
http://www.gigasize.com/
http://www.savefile.com/
http://www.ifolder.ru/
http://www.come2store.com/
http://www.filefactory.com/
http://www.filepost.ru/
http://www.netload.in/
http://www.webfile.ru/
http://www.yourfilelink.com/


These are file hosts that use special download systems and non-standard ports.

At the moment I would recommend not using these hosts.   Their down loader APP's will not work for some users.   Also the non standard port will be blocked by some ISP's and firewalls.

http://www.mega.co.nz/
https://www.oboom.com/


These are file backup/storage sites.

Please do not use these on the forum as they are not designed for forum sharing.

http://www.uploading.com/
https://www.dropbox.com/
https://www.sendthisfile.com/
http://www.drive.google.com/
http://www.divshare.com/
http://www.skydrive.com/
https://www.sugarsync.com/
http://www.icloud.com/
http://dropcanvas.com/
http://www.box.com/
https://www.wetransfer.com/
http://www.hightail.com/
https://www.box.com/
http://streamfile.com/
http://www.dropsend.com/
https://www.transferbigfiles.com/
https://onehub.com/
https://droplr.com/
http://www.egnyte.com/
https://onedrive.live.com/
https://www.exavault.com/
http://www.securelysend.com/
http://www.files2u.com/
http://www.driveway.com/
https://www.box.net/
http://www.senduit.com/
http://www.filedropper.com/


These sites are direct user to site to user.

Please do not use these on the forum as they are not designed for forum use.

http://pipebytes.com/


These sites are designed for E-mail file hosting.

Please do not use these on the forum as they are not designed for forum use.

http://www.mailbigfile.com/
https://itrnsfr.com/


These are file hosts that provide time limited file hosting

On these hosts you can set a time limit for the file to available.
Do not use these on the forum as other forum users will not be happy if your links don't work.

http://minus.com/
https://www.filemail.com/
http://wikisend.com/


Offline Sar-Net

  • Jr. Member
  • **
  • Posts: 457
  • Activity:
    0%
  • KARMA: 3205
14.) How to add Flash Video to your post
« Reply #14 on: October 27, 2014, 11:30:21 am »

How to add Flash Video to your post.


Here I will go over posting flash videos to show in the forum.

It is currently only allowed in one section of the forum to post a Flash video link or post a flash video as an embedded object.
Flash Muscle & Fitness Videos - Auctions & Gossip

Remember when you have a video you wish to post on the forum you should use the info provided in a prior section of this guide rather than uploading it to a flash video site.  There are many reasons for this but the biggie is when you post a video on Youtube, Dailymotion, etc. they recompress the video loosing quality, adding color banding, loosing detail, etc.

The use of Flash video should only be for posting links you find.  A good example of what to post is videos that do not appear anywhere else such as the flash videos Erica Cordie and Sophie Arvebrink post on Youtube as these are videos they create themselves.

Please do not clutter up the forum with a bunch of sample video clips or other junk flash clips.


Posting a flash video similar to other links.  Remember this is only allowed in one section of the forum Flash Muscle & Fitness Videos - Auctions & Gossip.

First paste your link into the post box.
Then select the link.
Then click the flash icon. (See icon in Example 1 at end of post.)
You will see [ flash=200,200 ]  [ /flash ] around your link.

You will need to change this to fit your video aspect ratio.
[ flash=720,400 ]  [ /flash ] for 16/9 videos.
[ flash=640,400 ]  [ /flash ] for old 4/3 videos.

Your finished link should look something like this. [ flash=720,400 ]http://www.youtube.com/v/7USbRfVLfsY[ /flash ]

And it will show up in your post like this.

<a href="http://www.youtube.com/v/7USbRfVLfsY" target="_blank" rel="noopener noreferrer" class="bbc_link bbc_flash_disabled new_win">http://www.youtube.com/v/7USbRfVLfsY</a>


If you just have a link to view a Youtube video you can use the info below to change a viewing link to an embedded link. Thanks goto RobMash for providing this info.
Step 1 Copy and glue the link on your post
Step 2 Delete the letters "watch?" and replace the "=" after the v with /

Example:
Original link:        http://www.youtube.com/watch?v=4hHHhPe0VJM
Modified link:       http://www.youtube.com/v/4hHHhPe0VJM

Step 3 click on Flash icon. (See Example 1 below.)
Step 4 Replace in the code the values 200,200 with 720,400 for 16/9 videos or 640,480 for older 4/3 videos.

This is how the link should look in your post when done.  [ flash=640,400 ]http://www.youtube.com/v/4hHHhPe0VJM[ /flash ] 

And it should display in your post like this.
<a href="http://www.youtube.com/v/4hHHhPe0VJM" target="_blank" rel="noopener noreferrer" class="bbc_link bbc_flash_disabled new_win">http://www.youtube.com/v/4hHHhPe0VJM</a> 


If you just have a link to view a Dailymotion video you can use the info below to change a viewing link to an embedded link. Thanks goto Drucky for providing this info.

Step 14 copy and paste the Dailymotion link in your post
Step 2 delete the letters "video" and replace with "swf".
Step 3 remove everything after the first few letters after the last / beginning with the "_", I have colored the excess stuff to remove blue in the example link below.

Example:
Original link:        http://www.dailymotion.com/video/xjjuzy_little-muscle-girl-angie_sport?from_related=related.page.int.gravity-only.57cca18f7e04587ae32df415e478acf1141742662

Modified link:       http://www.dailymotion.com/swf/xjjuzy

Step 4 select corrected link
Step 5 click on Flash icon. (See Example 1 below.)
Step 6 Replace in the code the values 200,200 with 720,400 for 16/9 videos or 640,480 for older 4/3 videos.

The corrected link will now look like this  [ flash=640,480 ]http://www.dailymotion.com/swf/xjjuzy[ /flash ]

And will appear in your post like this.
<a href="http://www.dailymotion.com/swf/xjjuzy" target="_blank" rel="noopener noreferrer" class="bbc_link bbc_flash_disabled new_win">http://www.dailymotion.com/swf/xjjuzy</a>


Forum Saradas  |  Female BodyBuilding & Fitness & Figure - Members Area  |  All rules and guidelines - FAQ | News & Announcements  |  Guide to The Post Box and General Guide on Posting.
 

gfxgfx
Forum Saradas does not host any files on its own servers.
gfx
It only points to various links on the Internet that already exist.
It is recommended to buy Original Video, CD, DVD's and pictures only.
gfx
Mobile View